ECO mode Ram 1500 2013 Get to Know Guide
[x] Cancel search | Manufacturer: RAM, Model Year: 2013, Model line: 1500, Model: Ram 1500 2013Pages: 196, PDF Size: 9.66 MB
Page 3 of 196

INTRODUCTION/WELCOME
WELCOME FROM CHRYSLER
GROUP LLC.................. 3
CONTROLS AT A GLANCE
DRIVER COCKPIT .............. 6
INSTRUMENT CLUSTER .......... 8
GETTING STARTED
KEYFOB ................... 10
KEYLESS ENTER-N-GO™ ......... 11
REMOTE START .............. 13
THEFT ALARM ............... 13
SEATBELT .................. 13
SUPPLEMENTAL RESTRAINT
SYSTEM (SRS) — AIR BAGS ....... 14
CHILD RESTRAINTS ............ 15
FRONT SEATS ................ 20
HEATED/VENTILATED SEATS ....... 22
HEATED STEERING WHEEL ........ 23
TILT STEERING COLUMN ......... 24
OPERATING YOUR VEHICLE
ENGINE BREAK-IN
RECOMMENDATIONS........... 25
TURN SIGNALS/WIPER/WASHER/
HIGH BEAMS LEVER ............ 26
HEADLIGHT SWITCH ............ 27
SPEED CONTROL .............. 28
EIGHT–SPEED AUTOMATIC
TRANSMISSION — IF EQUIPPED .... 29
ELECTRONIC RANGE SELECT (ERS)
OPERATION ................. 30
AIR SUSPENSION SYSTEM ........ 32
MANUAL CLIMATE CONTROLS
WITHOUT TOUCH-SCREEN ........ 34
MANUAL CLIMATE CONTROLS
WITH TOUCH-SCREEN ........... 35
AUTOMATIC CLIMATE CONTROLS
WITH TOUCH-SCREEN ........... 36
PARKSENSE
®REAR PARK ASSIST . . . 37
PARKVIEW®REAR BACK-UP
CAMERA ................... 38
TIRE PRESSURE MONITOR SYSTEM
(TPMS) – 2500 MODELS ONLY ...... 38
POWER SLIDING REAR WINDOW .... 39
POWER SUNROOF ............. 40
WIND BUFFETING ............. 41
ELECTRONICS
YOUR VEHICLE'S SOUND SYSTEM . . . 42
IDENTIFYING YOUR RADIO ........ 44
Uconnect
®Access (AVAILABLE ON
Uconnect®8.4A AND Uconnect®8.4AN)
(IF EQUIPPED) ................ 45
Uconnect
®3.0 ................ 54
Uconnect®5.0 ................ 56 Uconnect
®8.4A ............... 62
Uconnect®8.4AN .............. 79
STEERING WHEEL AUDIO
CONTROLS .................. 97
ELECTRONIC VEHICLE
INFORMATION CENTER (EVIC) ..... 98
PROGRAMMABLE FEATURES ....... 98
UNIVERSAL GARAGE DOOR OPENER
(HomeLink
®) ................ 101
POWER INVERTER ............ 103
POWER OUTLETS ............ 104
OFF-ROAD CAPABILITIES
FOUR WHEEL DRIVE OPERATION . . . 105
UTILITY
TONNEAU COVER............. 108
EASY-OFF TAILGATE ........... 108
PICKUP BOX ................ 109
RAMBOX
®.................. 110
TOWING & PAYLOAD ........... 114
TOW/HAUL MODE ............ 116
INTEGRATED TRAILER BRAKE
MODULE .................. 116
RECREATIONAL TOWING
(BEHIND MOTORHOME, ETC.) ..... 118
DIESEL
DIESEL ENGINE BREAK-IN
RECOMMENDATIONS........... 120
DIESEL ENGINE STARTING
PROCEDURES ............... 120
DIESEL EXHAUST BRAKE
(ENGINE BRAKING) ........... 121
IDLE-UP FEATURE (AUTOMATIC
TRANSMISSION ONLY) ......... 122
ENGINE MOUNTED FUEL
FILTER/WATER SEPARATOR ....... 123
UNDERBODY MOUNTED FUEL
FILTER/WATER SEPARATOR ....... 124
ADDING FUEL – DIESEL ENGINE
ONLY ..................... 125
EXHAUST REGENERATION ....... 125
COOL-DOWN IDLE CHART ........ 127
DIESEL EXHAUST FLUID ........ 127
WHAT TO DO IN EMERGENCIES
ROADSIDE ASSISTANCE......... 130
INSTRUMENT CLUSTER WARNING
LIGHTS ................... 130
IF YOUR ENGINE OVERHEATS ..... 134
JACKING AND TIRE CHANGING .... 135
JUMP-STARTING ............. 148
EMERGENCY TOW HOOKS ....... 150
SHIFT LEVER OVERRIDE ........ 150
TOWING A DISABLED VEHICLE .... 153
FREEING A STUCK VEHICLE ...... 154
EVENT DATA RECORDER (EDR) .... 155
TABLE OF CONTENTS
Page 12 of 196

KEY FOB
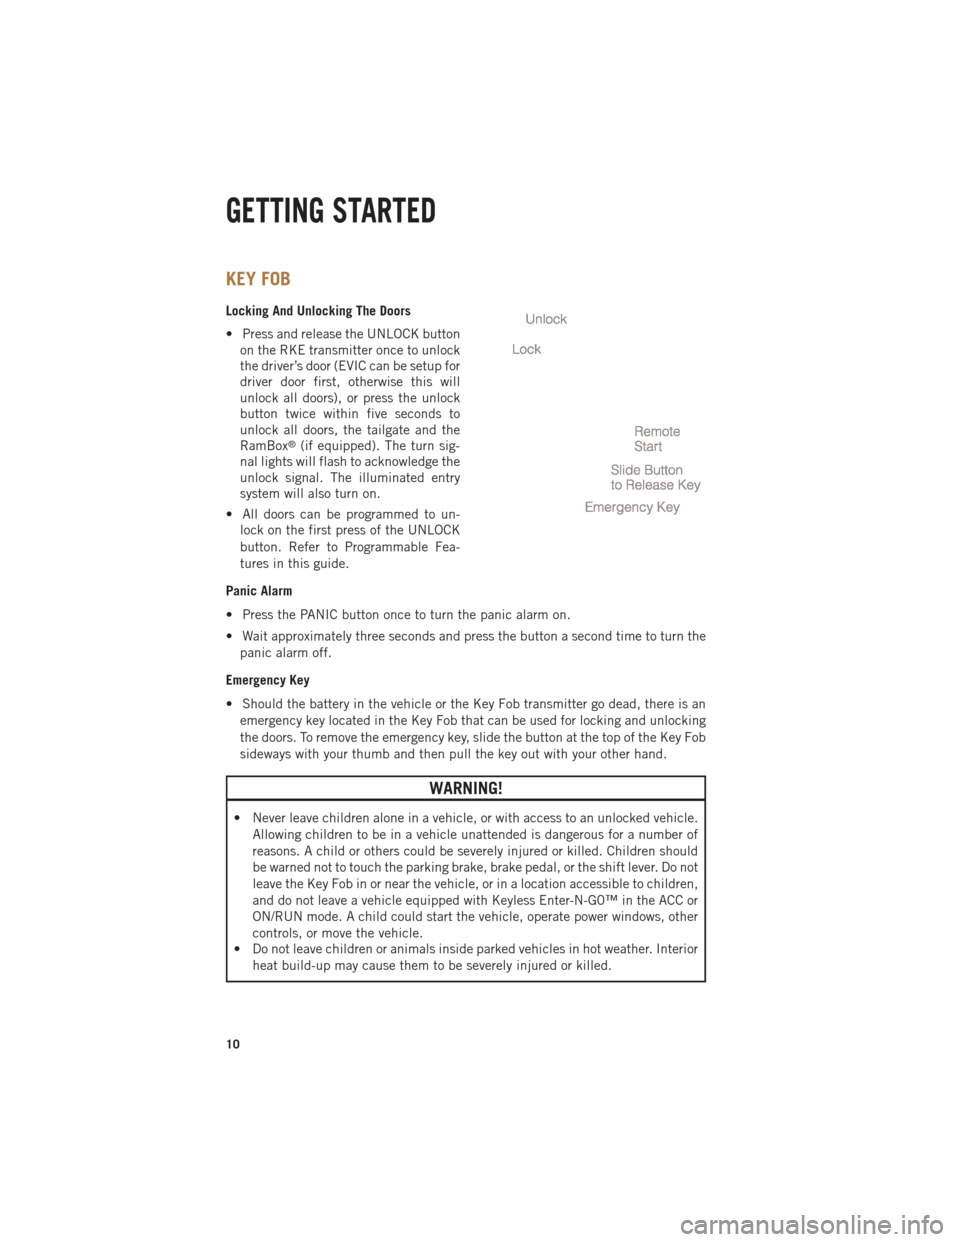
Locking And Unlocking The Doors
• Press and release the UNLOCK buttonon the RKE transmitter once to unlock
the driver’s door (EVIC can be setup for
driver door first, otherwise this will
unlock all doors), or press the unlock
button twice within five seconds to
unlock all doors, the tailgate and the
RamBox
®(if equipped). The turn sig-
nal lights will flash to acknowledge the
unlock signal. The illuminated entry
system will also turn on.
• All doors can be programmed to un- lock on the first press of the UNLOCK
button. Refer to Programmable Fea-
tures in this guide.
Panic Alarm
• Press the PANIC button once to turn the panic alarm on.
• Wait approximately three seconds and press the button a second time to turn the panic alarm off.
Emergency Key
• Should the battery in the vehicle or the Key Fob transmitter go dead, there is an emergency key located in the Key Fob that can be used for locking and unlocking
the doors. To remove the emergency key, slide the button at the top of the Key Fob
sideways with your thumb and then pull the key out with your other hand.
WARNING!
• Never leave children alone in a vehicle, or with access to an unlocked vehicle. Allowing children to be in a vehicle unattended is dangerous for a number of
reasons. A child or others could be severely injured or killed. Children should
be warned not to touch the parking brake, brake pedal, or the shift lever. Do not
leave the Key Fob in or near the vehicle, or in a location accessible to children,
and do not leave a vehicle equipped with Keyless Enter-N-G0™ in the ACC or
ON/RUN mode. A child could start the vehicle, operate power windows, other
controls, or move the vehicle.
• Do not leave children or animals inside parked vehicles in hot weather. Interior
heat build-up may cause them to be severely injured or killed.
GETTING STARTED
10
Page 27 of 196

ENGINE BREAK-IN RECOMMENDATIONS
• A long break-in period is not required for the engine and drivetrain (transmissionand axle) in your vehicle.
• Drive moderately during the first 300 miles (500 km). After the initial 60 miles (100 km), speeds up to 50 or 55 mph (80 or 90 km/h) are desirable.
• While cruising, brief full-throttle acceleration within the limits of local traffic laws contributes to a good break-in. Wide-open throttle acceleration in low gear can be
detrimental and should be avoided.
• The engine oil installed in the engine at the factory is a high-quality energy conserving type lubricant. Oil changes should be consistent with anticipated
climate conditions under which vehicle operations will occur. For the recom-
mended viscosity and quality grades, refer to “Maintaining Your Vehicle”.
NOTE:
A new engine may consume some oil during its first few thousand miles (kilometers)
of operation. This should be considered a normal part of the break-in and not
interpreted as an indication to an engine problem or malfunction.
CAUTION!
Never use Non-Detergent Oil or Straight Mineral Oil in the engine or damage may
result.
DIESEL ENGINE BREAK-IN RECOMMENDATIONS
For diesel engine break-in recommendations, refer to Diesel Engine Break-In Recom-
mendations on pg.
120
OPERATING YOUR VEHICLE
25
Page 34 of 196

AIR SUSPENSION SYSTEM
• The air suspension system provides full time load leveling capability along withthe benefit of being able to adjust vehicle height by the push of a button.
• Automatic height changes will occur based on vehicle speed and the current vehicle height. The indicator lamps and EVIC messages will operate the same for
automatic changes and user requested changes.
Description
• Normal Ride Height (NRH) - This is the
standard position of the suspension
and is meant for normal driving.
• Off-Road 1 (OR1) (Raises the vehicle
approximately 1 in (26 mm) - This posi-
tion should be the primary position for
all off-road driving until Off Road 2
(OR2) is needed. A smoother and more
comfortable ride will result. To enter
OR1, press the “Up” button once from
the NRH position while the vehicle speed is below 35 mph (56 km/h). When in the
OR1 position, if the vehicle speed remains between 40 mph (64 km/h) and
50 mph (80 km/h) for greater than 20 seconds or if the vehicle speed exceeds
50 mph (80 km/h), the vehicle will be automatically lowered to NRH. Off-Road 1
may not be available due to vehicle payload, an EVIC message will be displayed
when this occurs. Refer to “Electronic Vehicle Information Center (EVIC)” in
“Understanding Your Instrument Panel” for further information.
• Off-Road 2 (OR2) (Raises the vehicle approximately 2 in (51 mm) -
This position is
intended for off-roading use only where maximum ground clearance is required.
To enter OR2, press the “Up” button twice from the NRH position or once from the
OR1 position while vehicle speed is below 20 mph (32 km/h). While in OR2, if the
vehicle speed exceeds 25 mph (40 km/h) the vehicle height will be automatically
lowered to OR1. Off-Road 2 may not be available due to vehicle payload, an EVIC
message will be displayed when this occurs. Refer to “Electronic Vehicle Information
Center (EVIC)” in “Understanding Your Instrument Panel” for further information.
• Aero Mode (Lowers the vehicle approximately .6 in (15 mm) – 1500 Models Only - This
position provides improved aerodynamics by lowering the vehicle. The vehicle will
automatically enter Aero Mode when the vehicle speed remains between 62 mph
(100 km/h) and 66 mph (106 km/h) for greater than 20 seconds or if the vehicle
speed exceeds 66 mph (106 km/h). The vehicle will return to NRH from Aero Mode
if the vehicle speed remains between 30 mph (48 km/h) and 35 mph (56 km/h) for
greater than 20 seconds or if the vehicle speed falls below 30 mph (48 km/h).
OPERATING YOUR VEHICLE
32
Page 35 of 196

NOTE:
Aero Mode may be disabled through vehicle settings in the Electronic Vehicle
Information Center (EVIC) or in the Uconnect
®8.4 Radio (If Equipped).
•
Entry/Exit Mode (Lowers the vehicle approximately 2 in (51 mm)- This position lowers
the vehicle for easier passenger entry and exit as well as lowering the rear of the
vehicle for easier loading and unloading of cargo. To enter Entry/Exit Mode, press
the “Down” button once from the NHR while the vehicle speed is below 33 mph
(53 km/h). Once the vehicle speed goes below 15 mph (24 km/h) the vehicle
height will begin to lower. If the vehicle speed remains between 15 mph (24 km/h)
and 25 mph (40 km/h) for greater than 60 seconds, or the vehicle speed exceeds
25 mph (40 km/h) the Entry/Exit change will be cancelled. To return to Normal
Height Mode, press the “Up” button once while in Entry/Exit or drive the vehicle
over 15 mph (24 km/h). Entry/Exit mode may not be available due to vehicle
payload, an EVIC message will be displayed when this occurs. Refer to "Electronic
Vehicle Information Center (EVIC)" in "Understanding Your Instrument Panel" for
further information.
• Refer to your Owner’s Manual on the DVD for further details.
Air Suspension Modes
• The Air Suspension system has multiple modes to protect the system in unique situations:
Tire Jack Mode
•
To assist with changing a spare tire, the air suspension system has a feature which
allows the automatic leveling to be disabled. Refer to “Electronic Vehicle Information
Center (EVIC)” in “Understanding Your Instrument Panel” for further information.
NOTE:
This mode is intended to be enabled with engine running.
Transport Mode
• To assist with flat bed towing, the air suspension system has a feature which will put the vehicle into Entry/Exit height and disable the automatic load leveling
system. Refer to “Electronic Vehicle Information Center (EVIC)” in “Understand-
ing Your Instrument Panel” for further information.
NOTE:
This mode is intended to be enabled with engine running.
Wheel Alignment Mode
•
Before performing a wheel alignment this mode must be enabled. Refer to “Elec-
tronic Vehicle Information Center (EVIC)” in “Understanding Your Instrument Panel”
for further information.
NOTE:
This mode is intended to be enabled with engine running.
OPERATING YOUR VEHICLE
33
Page 39 of 196

Air Conditioning (A/C)
• If the air conditioning button is pressed while in AUTO mode, the system will exitAUTO mode and stay in A/C. The mode and blower will be set at the closest mode
and blower position that the system was operating in AUTO.
SYNC Temperature Soft-Key
• Touch the SYNC soft-key on the Uconnect
®Access radio to control the driver and
passenger temperatures simultaneously. Touch the SYNC soft-key a second time to
control the temperatures individually.
Air Recirculation
• Use recirculation for maximum A/C operation.
• For window defogging, turn the recirculation button off.
• If the Recirculation button is pushed while in the AUTO mode, the indicator light may flash three times to indicate the cabin air is being controlled automatically.
Heated Mirrors
• The mirrors are heated to melt frost or ice. This feature is activated whenever you turn on the defroster.
PARKSENSE® REAR PARK ASSIST
• If an object is detected behind the rear bumper while the vehicle is in REVERSE,a warning will display in the instrument cluster and a tone, that changes speed
depending on the distance of the object from the bumper, will sound.
Service The ParkSense® Rear Park Assist System
• When the ParkSense
®Rear Park Assist System is malfunctioning, the instrument
cluster will actuate a single chime, once per ignition cycle, and it will display the
“CLEAN PARK ASSIST SENSORS” or the “SERVICE PARK ASSIST SYSTEM”
message.
• If “CLEAN PARK ASSIST SENSORS” appears in the Electronic Vehicle Informa- tion Center (EVIC) and the rear fascia/bumper is clean and clear of snow, ice, mud,
dirt or other obstruction, see your authorized dealer.
• If “SERVICE PARK ASSIST SYSTEM” appears in the EVIC, see your authorized dealer.
Enable/Disable ParkSense®
• ParkSense
®can be enabled and disabled with a switch located in the switch bank
of the instrument panel or through the Customer-Programmable Features section
of the EVIC. When the switch is pressed to disable the system, the instrument
cluster will display the “PARK ASSIST SYSTEM OFF” message for approximately
five seconds.
OPERATING YOUR VEHICLE
37
Page 40 of 196

PARKVIEW® REAR BACK-UP CAMERA
• You can see an on-screen image of the rear surroundings of your vehicle wheneverthe shift lever is put into REVERSE. The ParkView®Rear Back-Up Camera image
will be displayed in the rearview mirror or touchscreen display along with a caution
note to “check entire surroundings” across the top of the screen. After five seconds
this note will disappear.
• If the rearview mirror or touchscreen display appears foggy, clean the ParkView
®
camera located to the left of the tailgate handle.
WARNING!
Drivers must be careful when backing up; even when using the ParkView®Rear
Back-Up Camera. Always check carefully behind your vehicle, and be sure to
check for pedestrians, animals, other vehicles, obstructions, or blind spots before
backing up. You must continue to pay attention while backing up. Failure to do so
can result in serious injury or death.
TIRE PRESSURE MONITOR SYSTEM (TPMS) – 2500 MODELS
ONLY
Tire Light Load Inflation Switch Description
•
The Tire Pressure Monitoring System on your vehicle has two different tire pressure
settings based on vehicle loading. The Tire Light Load Switch is located on the
Instrument Panel below the climate controls.
• The “Light Load Inflation” and “Max Load Inflation” tire pressures recommended for your vehicle based on vehicle loading are found on the Supplemental Tire
Pressure Information Label located on the rear face of the driver front door.
•
When the vehicle is in the “Light Load Inflation” setting, the Tire Light Load Inflation
switch is On. The indicator light is Off when in the “Max Load Inflation” setting.
Light Load Inflation (Indicator Light On)
• If the passenger and cargo weights are less than the Light Load Pressure Definition shown on the Supplemental Tire Pressure Information Label, inflate or
deflate tires to the correct “Light Load Inflation” pressure. If the indicator light is
not on, the mode can be changed by pushing the switch once.
• If the light on the switch flashes On and Off, after the button is pressed to switch
between modes, this indicates conditions are not correct to switch modes. The system
will not allow switching modes until the tire pressures have been set to Light Load
Inflation as indicated on the Supplemental Tire Pressure Information Label.
OPERATING YOUR VEHICLE
38
Page 50 of 196

Purchasing Apps and WiFi
NOTE:
Apps and WiFi can be purchased from the Uconnect®Store within your vehicle, and
online at Mopar Owner Connect. You must first register and set up a Uconnect®Payment
account.
Purchasing Apps and WiFi for your vehicle
1. With the vehicle parked and the radio powered on, select the “Apps” soft-key located near the bottom right-hand corner of the radio touch screen.
2. To launch the Uconnect
®Store, select Tools and then select Uconnect®Store.
3. From the Uconnect
®Store, select the Application (App) you wish to purchase.
4.
This will launch the selected App into purchase mode along with providing additional
information. The purchase process begins when you touch the “Buy” soft-key.
5. The Uconnect®Store will display a “Purchase Overview” message confirming the
financial details for the App you are about to purchase. Touch the “Purchase” key
to continue.
6.
The Uconnect®Store will ask you to “Confirm Payment” using your default payment
method on file in your Payment Account. Touch the Complete key to continue.
7. The Uconnect®Payment Account will then ask for your “Payment Account PIN”.
After entering this four digit PIN, touch the Complete key to make the purchase.
8. You will receive a confirmation message that your purchase has been submitted. Touch the OK to end the process.
NOTE:
Purchased apps can take up to 30 minutes to download, depending on your vehicle’s
cellular coverage at time of purchase. If your download takes more than 30 minutes,
please contact Uconnect
®Care by pressing the ASSIST button on the rear view mirror.
• You can also purchase apps or renew your subscription to a package from the Mopar Owner Connect website. Log In to the Mopar Owner Connect website
(www.moparownerconnect.com) with your user name and password, and click on
the “Store” tab.
Using Uconnect® Access
Getting Started with Apps
•
Applications (Apps) in your Uconnect®Access system deliver features and services
that are customized for the driver and are certified by Chrysler Group, LLC. Two
different types are:
• Built-In Apps – use the built-in 3G Cellular Network on your Uconnect® radio.
• Brought-In Apps – Uconnect
®Access will allow you to use your own smartphone
or device’s data plan and connection to stream content from Chrysler Group, LLC
certified apps into your vehicle and control them using the Uconnect
®radio
touch-screen, steering wheel controls, and voice recognition.
ELECTRONICS
48
Page 57 of 196

Store Radio Presets
• The Presets are available for all Radio Modes, and are activated by touching anyof the six Preset buttons.
• When you are receiving a station that you wish to commit into memory, press and hold the desired numbered button for more that 2 seconds or until you hear a
confirmation beep.
• The Radio stores up to 18 presets in each of the Radio modes. Press the A-B-C hard-key to select the A, B or C preset list.
Disc Operation
• Your vehicle may have a remote CD player located in the lower center console storage bin, or in the lower center bench seat bin.
• CD/Disc Mode is entered by either inserting a CD/Disc or by touching the Media button located on the side of the display. Once in Media Mode, select Disc.
• Gently insert one CD into the CD player with the CD label facing as indicated on the illustration located on the Disc player.
Seek Up/Down Buttons
• Press to seek through CD tracks.
• Hold either button to bypass tracks without stopping.
USB/Audio Jack (AUX) Operation
USB/iPod®
• USB/iPod
®Mode is entered by either inserting a USB Jump Drive or iPod®cable
into the USB port or by touching the Media button located left of the display. Once
in Media Mode, select USB/iPod
®for the source.
• Pressing the Media button, then select USB/iPod
®to change the mode to the USB
device if the device is connected, allowing the music from your portable device to
play through the vehicle's speakers.
Audio Jack (AUX)
• The AUX allows a portable device, such as an MP3 player or an iPod
®,tobe
plugged into the radio and utilize the vehicle’s audio system, using a 3.5 mm audio
cable, to amplify the source and play through the vehicle’s speakers.
• Pressing the Media button, then touch the Source soft-key and then select AUX to change the mode to auxiliary device if the audio jack is connected, allowing the
music from your portable device to play through the vehicle's speakers.
• The functions of the portable device are controlled using the device buttons, not the buttons on the radio. The volume may be controlled using the radio or portable
device.
ELECTRONICS
55
Page 59 of 196

2. Touch the Up or Down arrows to adjust the hours or minutes, next select the AMor PM soft-key. You can also select 12hr or 24hr format by touching the desired
soft-key.
3. Once the time is set press the “Done” soft-key to exit the time screen.
Equalizer, Balance and Fade
1. Press the SETTINGS hard-key on the right side of the unit.
2. Then scroll down and press the Audio soft-key to get to the Audio menu.
3.
The Audio Menu shows the following options for you to customize your audio settings.
Equalizer
• Touch the Equalizer soft-key to adjust the Bass, Mid and Treble. Use the + or - soft-key to adjust the equalizer to your desired settings. Press the back arrow
soft-key when done.
Balance/Fade
• Touch the Balance/Fade soft-key to adjust the sound from the speakers. Use the arrow soft-key to adjust the sound level from the front and rear or right and left side
speakers. Touch the Center “C” soft-key to reset the balance and fade to the
factory setting. Press the back arrow soft-key when done.
Speed Adjustable
• Touch the Speed Adjusted Volume soft-key to select between OFF, 1, 2 or 3. This will decrease the radio volume relative to a decrease in vehicle speed. Press the
back arrow soft-key when done.
Loudness
• Touch the Loudness soft-key to select the Loudness feature. When this feature is activated it improves sound quality at lower volumes.
Radio Operation
Seek Up/Down Buttons
• Press to seek through radio stations in AM, FM or SXM bands.
• Hold either button to bypass stations without stopping.
Store Radio Presets
• When you are receiving a station that you wish to commit into memory, press and hold the desired numbered soft-key for more that 2 seconds or until you hear a
confirmation beep.
• The Radio stores up to 12 presets in each of the Radio modes. 4 presets are visible at the top of the radio screen. Touching the “all” soft-key on the radio home screen
will display all of the preset stations for that mode.
ELECTRONICS
57